Example 1 - Device Information
A simple example to show the basic setup and use of SparkFun ST25DV64KC Arduino Library.
Key Features
- Declaring a SFE_ST25DV64KC tag object
- Beginning communication with the tag over I2C
- Reading the tag's Unique Identifier (UID)
- Reading the tag's Device Revision
Setup
After installing this library in your local Arduino environment, begin with a standard Arduino sketch and include the header file for this library:
#include <SparkFun_ST25DV64KC_Arduino_Library.h> // Click here to get the library: http://librarymanager/All#SparkFun_ST25DV64KC
The next step is to declare the ST25DV64KC object. Like most Arduino sketches, this is done at a global scope (after the include file declaration), not within the setup() or loop() functions.
Select one of the following classes:
| Class | Description |
|---|---|
SFE_ST25DV64KC |
This is the core class - it provides read and write methods to access the tag's EEPROM memory |
SFE_ST25DV64KC_NDEF |
This class provides additional methods to read and write NDEF URI, WiFi and Text records |
For this example, the SFE_ST25DV64KC class is used as we don't yet need access to the NDEF methods.
The later examples show how to use the NDEF methods. If you want to use those methods, the declaration becomes:
Initialization
In the setup() function of this sketch, we need to:
- Start
Wire(I2C) communication - Begin communication with the tag to ensure it is connected
void setup()
{
  delay(1000);

  Serial.begin(115200); // Start Serial (UART) communication

  Wire.begin(); // Start I2C communication

  Serial.println(F("ST25DV64KC example."));

  if (!tag.begin(Wire)) // Begin communication with the tag using the Wire port
  {
    Serial.println(F("ST25 not detected. Freezing..."));
    while (1) // Do nothing more
      ;
  }

  Serial.println(F("ST25 connected."));
The begin method tells the SFE_ST25DV64KC object that it is connected via the I2C port called Wire.
If your board supports multiple ports, you could (e.g.) replace Wire with Wire1 as appropriate.
If you call begin without naming a I2C port, the object assumes you are using Wire.
The begin method returns true if the ST25DV is connected. If it returns false, we know no device is connected and - in this simple example - the code will freeze at that point.
Reading the Unique Identifier
Each tag is pre-programmed with a unique 8-byte (64-bit) identifier which conforms to ISO/IEC 15693.
Not all platforms support the printing of 64-bit numbers so we: create an array of eight bytes to hold the UID; read the UID using getDeviceUID; and print it one byte at a time in hexadecimal format.
  uint8_t values[8] = {0};

  if (tag.getDeviceUID(values)) // Read the Unique Identifier
  {
    Serial.print(F("Device UID: "));
    for (uint8_t i = 0; i < 8; i++) // Print the UID in HEX format
    {
      if (values[i] < 0x0a) // Add a leading zero if required
        Serial.print(F("0"));
      Serial.print(values[i], HEX);
      Serial.print(F(" "));
    }
    Serial.println();
  }
  else
    Serial.println(F("Could not read device UID!"));
Like begin, getDeviceUID will return false if an error occurs. In this example, we print a warning message ("Could not read device UID!") if that happens.
It is fun to read the tag's identifier using ST's "NFC Tap" App on your smart phone and compare it to the UID printed by this example. You will find they are exactly the same. You can find "NFC Tap" in the Apple App Store and Google Play. Open the App, hit "Scan" and then "Read Tag". Hold your phone over the tag and the Tag Information will appear. On iPhones, the NFC reader is at the 'top' of the phone, near the cameras.
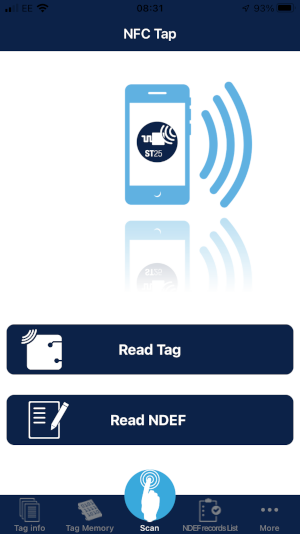
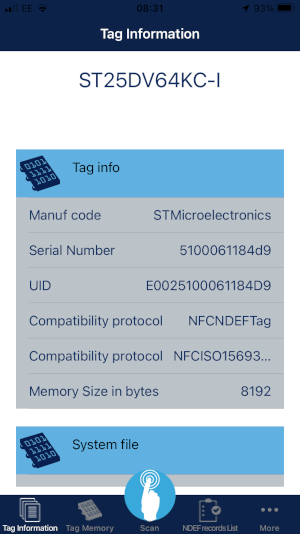
NFC Tap images. (Click to enlarge)

Reading the Tag Revision
Each tag is also programmed with a version number, indicating what version of hardware is inside the tag IC. We can read that using getDeviceRevision as follows:
  uint8_t rev;
  if (tag.getDeviceRevision(&rev)) // Read the Device Revision
  {
    Serial.print(F("Revision: "));
    Serial.println(rev); // Print it in decimal format
  }
  else
    Serial.println(F("Could not read device revision!"));
}
Again, getDeviceRevision will return false if an error occurs. If that happens, the "Could not read device revision!" warning is printed.
And that's all folks! There is no code inside loop() in this example.